Saturday, January 16, 2016

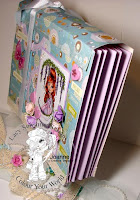
Wisteria Bloomin Treasures Colouring Storage Folder

Lately my "mojo" has been MIA.  Don't you just hate when that happens!  The trash bin saw more than it's fare share of colouring.  Then while looking for file storage online one night, up pops a tutorial to make your own!  Mojo is peeking over my shoulder ... I have the perfect paper in mind ... who would have thought a file storage search would restore creative harmony! 
  
I am using Wisteria Bloomin Treasures by artist Heather Valentin.  She is one of the lovely digi's from the Lacy Sunshine Blommin Treasures Coloring Page.  Of course she didn't want to be by herself so her friend, Plum Blossom Flower of Peace, from the same colouring page is also here today. You can find them at the Lacy Sunshine Shoppe

Now I have a special place for all my coloured LS stamps that is portable and pretty to look at!


 Wisteria Bloomin Treasures - Colouring Storage Folder


Wistera Bloomin Treasures colouring storage folder

A ribbon holds the folder closed making it easier to adjust as the folder expands

Colouring storage back view showing clear pocket
Back View
With the addition of a clear pocket, made using transparency film, there is a place for WIP colourings like Plum Blossom Flower of Peace Bloomin Treasure 

Divider view of Colouring Storage Folder
Inside of Colouring Storage Folder
Room for a growing collection with colourful dividers and expandable sides

Side view of Colouring Storage FolderCloseup side view of Westeria Bloomin Treasures Folder 

Close up of coloured Westeria Bloomin Treasures
Coloured with Copic Markers

copic colours used on Westeria Blooming Treasure


Cover paper Cherish by Carte Paper
Inside card stock from my stash
Flowers and Embellishments from my stash
Die Cuts Spellbinders Triple Tear
Transparency Film 

I had full intentions of taking photo's and adding instructions as the project progressed  but was so engrossed that I forgot and only have 2 WIP pictures to show you. There is a link to the tutorial at the end of this blog.

View of Colouring Storage Folder dividersBottom view of Coloring Storage Folder

Things adjusted to suit my needs: 
  1. added the clear "pocket" on the back using a transparency
  2. added 2 additional score lines to the top flap for easier closing adjustments
  3. used a heavier patterned card stock instead of covering the front and back pieces
  4. score tape was used instead of glue

Thanks to Pion Designs for the tutorial 


Sunday, January 10, 2016

Rory and Mikey - Flowers For You

Happy New Year Everyone!

Today I am showcasing a card made with Rory and Mikey - Flowers for You by artist Heather Valentin. You can find more Rory and Mikey stamps over at Lacy Sunshine Shoppe.  

This card will be on the Lacy Sunshine Blog with other cards by the Creative Design Team A.  Why not join in the fun and add your card to the Anything Goes challenge!


Rory and Mikey - Flowers for You 

Rory and Mikey flowers for you card
Front of Card

Rory and Mikey are coloured with Copic markers. 

inside rory and mikey flowers for you card
Inside of card
This card was a bit of a challenge for me.  I wanted to use my new dies from Spellbinders, Triple Tear, but wasn't sure how I was going to do that and showcase this lovely image.  After a few practice runs through the BigKick a plan started developing and my wish list started growing.  A magnetic plate would have been handy as the die shifted when I cut out half circles on each side of the card.  I ended up using some tape to hold it!

This all started started with a piece of card stock 8.5 x 5.5 inches scored at 2 1/8 and 6 3/8 inches.  Next step was to cut out the half circles and fold along the score lines.  Using the largest dies from the Triple Tear set cut the fancy trim for around the circle out of white card stock. The card is going to open so the die cut must be cut in half.  The front of the card was covered with heart paper from my stash and the die cut trim added around the circles on the front of the card.  The inside back of the card is coverd in the same paper as the front.  Center Rory and Mikey and attach in place.  I glued my card onto a slightly larger sheet of card stock because I felt it needed something more.  Use a piece of ribbon or glue a strip of card stock together large enough to wrap around your card to keep it closed.  Add a  few embellishments and your done. 

Copic colours used to colour Rory and Mikey - Flowers For You